How To Transplant Hollyhocks
You can transplant a hollyhock successfully when you know how they grow and how to care for them. Improve the chances of your hollyhocks surviving transplanting by following these care tips.
Why Did My Transplanted Hollyhock Die?
Transplant shock refers to the stress and potential setback experienced by perennial plants when they are moved from one location to another. This stress can result from disturbing the root system, changes in environmental conditions, and the plant’s struggle to establish itself in the new planting site. Symptoms of transplant shock may include drooping or shriveled leaves, and a general decline in the plant’s health as it adjusts to its new surroundings.
Transplant shock is a common occurrence when transplanting hollyhocks, but the severity of shock can be minimized by understanding the characteristics of the plant.
Help your hollyhock adjust to its new environment and increase its chance of surviving by following these tips.
- Transplant hollyhocks when they do not have buds or are not blooming. This would be in early spring or fall. Early spring is before they bloom, and fall is after they bloom.
- Hollyhocks should be placed in a bucket of water if they are not going to be transplanted right away after being dug up. A couple of days in a bucket of water should not hurt them if they cannot be replanted immediately. Be sure to keep them out of direct sunlight or wind.
- Young or seedling hollyhock plants typically handle transplanting better and do not shock as readily as mature plants. If you have a choice, choose younger plants to transplant. The root systems on young or seedling hollyhocks are not as deep as mature plants, making removal easier.
The Root System on a Hollyhock
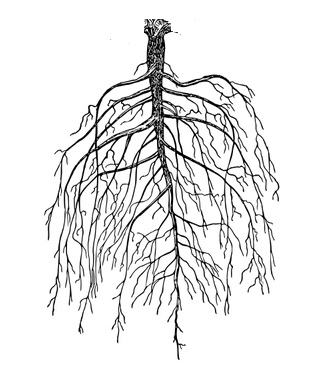
The main root of a Hollyhock is a taproot. It is thick at the base of the plant and has a tapering shape as it grows downward into the ground like a long narrow carrot. This taproot helps the hollyhock plant access water and nutrients from deep in the ground. Around the taproot are smaller roots that sprout horizontally from the taproot.

The taproot is the main root of the hollyhock plant. Protect and dig up as much of the taproot as possible to ensure the plant’s survival. Angling the shovel too sharply towards the center of the plant can cut the root too short. I like to use a round point shovel with a D-handle to dig deep and the D-handle provides leverage when removing the root ball.
Ideally, the entire taproot should be carefully excavated and transplanted with the hollyhock to minimize disturbance and help the plant establish itself in its new location.
On young hollyhock seedlings, the taproot is not as easy to distinguish from the auxiliary roots. It is also not as stiff, defined or deep as the tap root on mature plants. However, it serves the same purpose of supporting the hollyhock plant, so is just as important to make sure this root is captured in the root ball when the plant is dug up.
What do you do if you cut the hollyhock tap root short or it broke?
Plant the hollyhock anyway. There is always a chance that it will make it.
The Transplant Hole
When replanting the hollyhock, replicate the root placement as close as possible to the way the roots were growing when the plant was dug up. This means digging the hole deep enough so the tap root is replanted deep. The hole does not need to be dug all the way to the end of the tap root but should include as much as possible.
Dig the hole so the tap root is replanted straight down in the soil just like it was when it was dug up. Dig the hole as far as you can to accommodate the length of the tap root. In my clay soil, I would often hit a layer of rocks once I got so deep, and couldn’t go any further. Curl the end of the tap root at the base of the hole and it will find its way on its own.
Soil
Hollyhocks prefer well-drained soil and may struggle if the new planting location does not meet their needs. Hollyhocks will not tolerate wet soil. If soil does not drain well, Hollyhocks planted late in the fall may suffer from water freezing around roots that have not had time to establish.
Water
After transplanting, ensure the hollyhock is watered adequately to help it establish in its new environment. The taproot is deep into the ground so that it can access water during drought. Make sure you water the plant deeply, so it gets all the way down to the end of the taproot. A soaker hose is ideal for this purpose.
Pests
Hollyhocks can be susceptible to attacks from various insects, including aphids, Japanese beetles, spider mites, and caterpillars. These pests may feed on the leaves and stems of newly replanted hollyhocks, making their recovery difficult.
It seemed every time I replanted a hollyhock, the aphids would be waiting to attack the poor thing. A good spray from the hose would knock them off, and the hollyhock recovered. Regularly inspect your plants for insect infestations, identify the pests, and take appropriate measures to eradicate them.
Now that you are aware of these special circumstances when transplanting Hollyhocks, you can minimize shock and increase their chance of survival.


Comments
How To Transplant Hollyhocks — No Comments
HTML tags allowed in your comment: <a href="" title=""> <abbr title=""> <acronym title=""> <b> <blockquote cite=""> <cite> <code> <del datetime=""> <em> <i> <q cite=""> <s> <strike> <strong>