Daylily Seed or Bud?
Daylilies form seed pods that can be confusing to identify if you are not familiar with what they look like. So what does a daylily seed look like and what does a daylily bud look like?
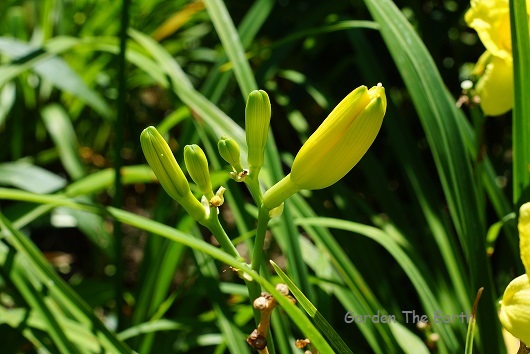
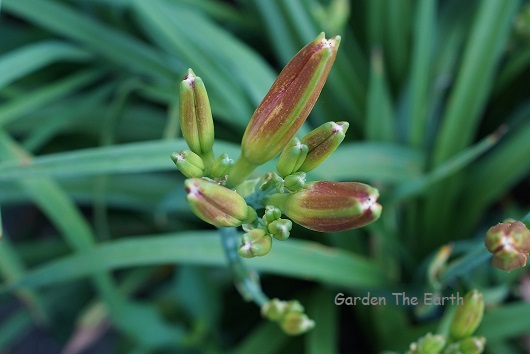
These are the buds. They are easier to identify when they are surrounded by other buds that are close to blooming. They are smooth on the outside and grow elongated from a smaller diameter before the bud expands where the petals begin. Often the color of the flower will begin to show on the outside before it blooms.
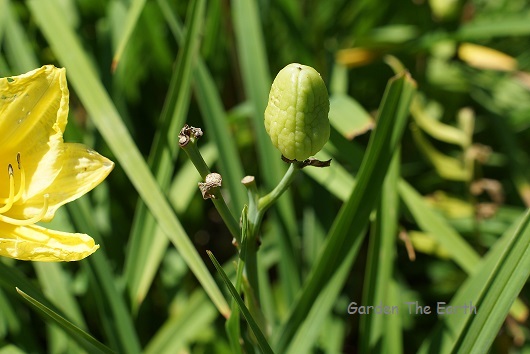
Above is a daylily seed pod. They are bulbous and wrinkly and one will sit upright on the end of a stem. Notice there is no smaller diameter leading to the bulb where it expands. They also have a light green color. As the seed pod ages, it will grow larger, get more wrinkles as it dries and become lighter in color, eventually brown.
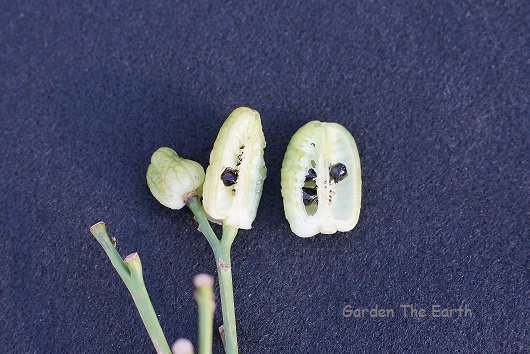
Inside the pod is what lily seeds look like. They start white and turn black as they age. Eventually the pod will dry enough to turn brown, crack open and the seeds will drop out or get knocked out by animals to germinate in the ground.

Explore More


Hi, my Aunt passed away and I dug up her ful grown Day Lilies and planted them in my yard. It’s only been 2 days but I’m worried . They base of them look like they are rotting. How do I save them ?
Hi Kelly,
It sounds like your daylilies might be experiencing some trouble. One of the most common signs of root rot in daylilies is when their leaves change color from green to yellow. However, this isn’t the only reason their leaves might change color, or their roots look like they’re rotting. Different issues can cause various symptoms, so it’s important to identify the correct problem.
To help you figure out what’s going on with your daylilies, check out the FAQ section on the American Daylily Society FAQ, (https://daylilies.org/daylilies/faq/) especially the “What diseases affect daylilies?” tab. Additionally, the Daylily Dictionary link at the bottom provides detailed information and pictures of various ailments.
These resources are fantastic for diagnosing the issue and finding ways to save your precious daylilies.
Wishing you and your daylilies all the best!
Nancy
that was the most straight forward and helpful explanation i have heard photps leave no doubt Thank Mike
Hi Mike,
Thank you for your comment! It’s my pleasure to have helped.
Nancy
Do you need to break the pods open to plant?
Hi Lynn,
I find it best to break the pods and remove daylily seeds before planting. Many dried pods on the plant will already be opened with seeds inside. Plant seeds at a depth that is equivalent to the size of the seed and will be covered with soil. Daylilies are easy to grow from seed, but do take about 2-3 weeks to germinate. Keep the soil moist during this time. Once you see leaves don’t allow the soil to dry excessively until they are established. Enjoy your daylilies!
Nancy
How do you know when day lily’s need to be divided?
Hi Teri,
You will know your daylilies need to be divided when you see a reduction in the quantity and quality of blooms from year to year. For the best performance, divide them every 3-4 years. If you don’t have a comparison of the bloom performance from the previous year, look at the center of the clump. If there is an open area where no leaves are growing or if weeds have overtaken the center, then your daylilies will benefit from being divided. Enjoy your daylilies!
Nancy
I have some day lilies that have been growing for over 20 years. One batch is planted against the back of my garage, facing west and the last two years, they have been straggly instead of nice and lush as usual. The other batch is against the north side of my house and they are doing the same thing. The ones along my fence and in my garden are still growing big and thick and lovely. Are the ones that are struggling doing so because they are right against the foundation of the house? Is it too hot with the sun reflecting off the siding? Are they just tired? I don’t know why it’s only been the last two years that they’ve struggled. I do keep them separated. Any advice would be greatly appreciated.
Hi Rita,
I think one possibility is the foundation causing restriction on the root development. Lilies can get root-bound in the center of the clump if they don’t have enough room to expand, and this will make them straggly and less productive. Another possibility I might consider is the quality of the soil. The soil may be depleted in this area and it could benefit from amending with organic matter such as compost or organic manure. This should give your lilies a healthy boost to get those lush leaves back.
Thank you for responding! Poor soil make sense and I don’t know why I hadn’t thought of it. I am in the Cleveland area and soil in my yard is lots of red clay. I used lots of compost and lime when I first dug the beds, but, as I said that was 20 years ago so they probably do need to be replenished. Thank you so much for your help!
Hi Rita,
Glad to help anytime. Enjoy your beautiful lilies!
Nancy
I want to keep my seeds. Do I need to wait until the pods turn brown before I gather them from the plant?
Hi Janice,
You want your seeds to be black, so leave the pods on the stem as long as possible. If you are concerned that the pods are about to split and drop your seeds, you can cut them off and let them finish drying elsewhere to catch the seeds. Best of luck with your baby lilies!
Nancy
Do day lily seed pods have orange seeds inside? I have a rogue plant that resembles a day lily, but don’t know where it came from. I don’t even recall if it bloomed this year or not, but it had a lot of these big green seed pods. When I cut one open, the big seeds inside were orange & looked like corn kernels. Not sure what I have growing out there, so would appreciate your thoughts on this colorful seed pod.
Thank you.
I have not seen orange seeds inside day lily pods – they start white and slowly brown as they dry until they are black. But some iris leaves are similar to day lily leaves and based on your description, I might suggest you have Iris foetidissima. They bloom in Spring, and the seeds stay orange even after the pod has dried. They are often added to fall decorations they are so pretty. Not being sure what zone you are in, they are hardy in zones 6-9. Hope this helps. Let me know if we need to keep looking it’s always fun to figure out the name of a mystery plant.
I have a mystery plant that I moved from my mom’s garden after she died….she called them her “fairy Lilly’s”…They shoot up green leaves kind of like iris in the spring….then disappear entirely…in August a tall…24+” beautiful flower comes….Do you know what they are? Thank you!
Hi Virginia,
That sounds like you have a Resurrection Lily (Lycoris squamigera). The flowers typically have a wonderful scent and last for a couple of weeks. They will multiply near each other to create groups of statuesque flowers in late summer. They are a wonderful gift to have in your garden!
Nancy
Elderly lady not good at computers. How soon after bloom must I remove daylily seed pods? What do I do with multiple bloom branches that haven’t completed bloom? Thank you for your help!
You can use scissors to carefully cut the spent flower or seed pod off any time after bloom, if desired. Don’t try to break them off as you may break the tip off with remaining buds too. For lilies that will only produce blooms once in the season, I just leave them in place until all blooms have completed. Then shortly after, cut the stalks close to the base of the plant. Enjoy your lilies!
This was excellent for me. I was fearful of removing new buds when attempting to deadhead spent blooms. Now, I’ll let them grow a bit to make sure of the different shapes.
Thank you! ?
Glad to have helped in your garden! Enjoy daylilies in many colors and apply the same technique to all. Happy gardening!
Very helpful. I always was afraid I’d be deadheading the flower bud! ?. Your description and photos made it so much clearer! Thank you!
Glad to have helped in your garden! You can apply this to most daylily varieties so enjoy them in many colors and use the same principle. Happy gardening!
Thank you! Just the straightforward explanation I needed.
Glad to have helped. Enjoy your lilies!
Thank you for this information and the helpful photos! This is exactly what I needed to know as a beginning gardener!
You’re very welcome! So glad to have helped!